
I would like to give a special thanks to Dick De Bruin for writing this manual for use on my web site. Dick De Bruin has put a great deal of his precious time into this. He is a member of Roger Ascham, Traditional Archery, a club associated with the British Longbow Society, and I invite everyone to check it out. If Mr. De Bruin is any indication, the club is a fantastic group of people. There is also a manual on making a longbow associated with this pate. Check it out!

Saw, tape measure, sandpaper, tapering tool, fletching tool, epoxy based glue, lacquer.
Introduction
An arrow basically consists of four parts: the pile (arrow point) the shaft, the nock and the fletches or feathers.
Making your arrows
A large number of woods are suitable to produce a shaft, I myself prefer Port Orford Cedar, but pine-wood may serve just as well. However, you cannot use just any old stick. The shaft must be absolutely straight. Also, an arrow must have a certain spine i.e. stiffness, so that it will not bend too much when loosed from a heavy bow, or remain too inflexible when loosed from a light bow. In other words the spine of your arrow must correspond to the strength of your bow. The easiest thing is to contact your Archery shop and buy them already selected for your needs. Be careful to indicate the strength of the bow to the salesperson so that he will provide you with the proper set of shafts. In the case of your shooting in a 40 lbs bow select shafts that have been weighed for 40 - 45 lbs. They usually come in batches of twelve and indeed it is a good idea to produce sets of twelve arrows at a time.
You will also need the piles (or points), nocks and fletches. All items are readily available from your Archery dealer.
For a 40 lbs longbow it would be wise to select shafts with a diameter of 5/16" (at any rate no thicker than 11/32")
The piles or points come in many varieties. For target shooting I prefer the brass ones, tapered inside, because they are easier to fit with the aid of a tapering tool (also available from your Archery dealer). This tapering tool is a kind of double barrelled "pencil sharpener", one half produces the tapering needed to fit the pile to the shaft, the other tapers the back of the shaft so that it will accommodate the nock.
Next establish your draw length. Ideally only the pile may protrude from the bow when fully drawn. One way of doing this is by placing one end of the shaft on your breastbone and then reaching forward with both arms until the tips of your fingers come together on the shaft as far away from the breastbone as possible. This is a very crude method, however. It is easier to have your draw length established in your Archery shop. The salespeople there have ways of doing precisely that.
Next use the tapering tool to taper the front of the shafts to accommodate the piles. Glue the piles to the shafts using epoxy based glue after scouring the inside with a degreaser (refined petrol). Allow them to dry (see the instructions that come with the glue).
Shorten the shaft to your draw length allowing an extra inch for the length of the pile. (So your draw length plus 2 or 2.5 cm).
Important!
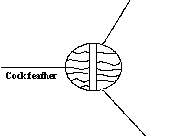 Before you start tapering the end which will accommodate the nock, first establish how the fibres of the shaft run, The nock will have to be fitted so, that the string is positioned at a right angle to the run of the fibre. Mark with a pencil the position of the cock feather, i.e. the fletch or feather that is positioned at a right angle to the string. Then after removing the inches from the shaft that you do not need, taper the back of the shaft using the tapering tool. Glue the nocks in position and allow to dry as long as it takes, depending on the glue used. Here again it is a good idea to use epoxy based glue as the nock will have to withstand a lot of punishment as does the pile.
Fletching
To apply the fletches, and, mind you, for traditional shooting you need actual birds' feathers, you will need another tool, a fletching tool that may also be obtained from your local Archery shop, unless of course you are one of the very few and far between who are so lucky as to have a carpenter's eye. You see, the fletches have to be applied at exactly 120o angles.
This process may take a while, depending on how fast the glue you use sets. Any glue will do. There is a special type of glue for fletching but I believe it will be cheaper to use the sort used in making model aeroplanes. As long as it fixes the feathers to the wooden shaft it is all right.
Should you use the fletching tool, apply the fletches c. 1/2 " from the nock. Insert the fletch into the tool, sand the back of the fletch, apply the glue and fix it on the shaft. Repeat the process with the other two (after reading the instructions that come with the tool) and repeat the process for each arrow you make.
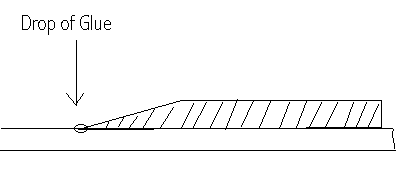
The arrows can now be finished by applying two layers of lacquer to the entire shaft. In order to avoid "feather cuts", rather nasty cuts in your bow hand caused by the sharp end of the fletch, it is a good idea to apply a small drop of glue to the feather that may cause the damage, i.e. the one under the cock feather.
You can now try out your arrows and find out about their various characteristics, they are your children, each one will behave differently, so it is a good idea to mark them, number them, so you will know which arrow strikes where, provided you shoot consistently.
![[To Longbow Page]](to-longbow.gif)
|
![[To Medieval Period Page]](../to-medieval.jpg)
|

|
![[To 'The Beckoning']](../../beckoning.jpg)
|